Mastering the Vintage Tea Cup SVG for Flawless Paper Crafting Projects
There is a distinct charm in paper crafting that digital designs simply cannot replicate on their own. When you bring timeless elegance to your projects with a Vintage Tea Cup SVG, you are tapping into a aesthetic that resonates deeply with recipients, whether for Mother's Day, bridal showers, or intimate tea parties. However, the difference between a charming keepsake box and a frustrating pile of cardstock often lies in the preparation and understanding of the digital file itself. Many crafters rush into cutting without fully evaluating the design specifications, leading to wasted materials and disjointed assemblies. By approaching your Vintage Tea Cup SVG project with a keen eye for detail, you can ensure your final product looks as professional as it feels personal.
Understanding the Design Before You Cut
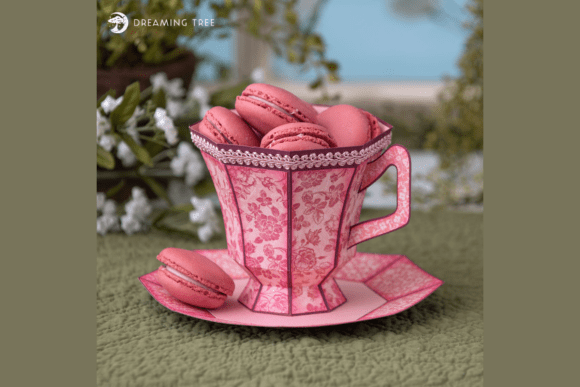
The allure of the vintage tea cup design is its delicacy. It pairs beautifully with patterned cardstock and embellishments like pearls, lace, or ribbon to create an authentic vintage look. Yet, this delicacy is often where beginners stumble. A common misconception is that all SVG files are created equal regarding complexity and cut settings. The Vintage Tea Cup SVG described here includes specific dimensions: a cup measuring 4" H x 4" W x 4" D, and a version with a saucer at 4" H x 6" W x 6" D. While these dimensions fit standard 12"x12" cutting mats, resizing the project without understanding the structural integrity of the design can lead to collapse.
If you scale the design down significantly to fit a smaller gift tag, the intricate tabs and slots designed for 65lb or 80lb cardstock may become too fragile to fold or glue effectively. Conversely, scaling up too much with lightweight paper can result in a box that sags under the weight of tea bags or treats. The best approach is to respect the original designer's intended scale for 3D structures. If you must resize, test a single prototype on scrap paper first to verify that the tabs still align and the structure holds its shape.
Navigating Material Choices and Supply Lists
One of the most frequent errors in paper crafting is ignoring the recommended supply list in favor of whatever scraps are currently on hand. For this specific project, the requirements call for two sheets of 12x12 Boysenberry cardstock, along with specific sizes of Blush, Pink Pattern, and Floral Pattern papers. Using paper that is too thin, such as standard printer paper, will fail to provide the rigidity needed for the box walls. On the other hand, using chipboard or overly thick cardboard might jam your cutting machine or prevent the delicate folds from creasing cleanly.
Furthermore, the inclusion of specific embellishments like Ink Pink Braid (3/8" thickness) is not merely decorative; it often serves a functional role in hiding seams or reinforcing handles. Skipping these elements because they seem optional can leave your project looking unfinished. When selecting your patterned papers, consider the direction of the print. A floral pattern that runs vertically on the side of the cup might look disjointed if the pieces are rotated incorrectly during assembly. Always lay out your digital legend alongside your physical paper before committing to the cut.
The Importance of the PDF Legend and Assembly Guide
You will receive this design in SVG format only, accompanied by a PDF legend. A critical mistake many users make is dismissing the PDF legend as unnecessary reading. This document is your roadmap. It helps you select papers and assemble with ease by indicating which layer corresponds to which part of the physical object. Ignoring this guide often leads to the frustration of having cut all the pieces only to realize the floral pattern is on the inside of the box where no one can see it, while the solid color is on the outside.
To make crafting even easier, a step-by-step video tutorial is often provided. Relying solely on intuition rather than watching the assembly process can cost you time and adhesive. The video demonstrates the specific order of folding and gluing, which is crucial for 3D boxes where access to inner tabs becomes impossible once the outer walls are secured. Treat the tutorial as a mandatory part of your workflow, not an optional extra.
Machine Compatibility and File Management
While the Vintage Tea Cup SVG is fully compatible with all SVG-ready cutting machines and software, issues often arise from how the file is imported. Some software automatically groups layers or welds paths upon import, which can interfere with the "print then cut" functionality if you are using patterned paper that requires precise registration marks. Before sending the design to your mat, ungroup the layers and inspect them. Ensure that the cut lines are visible and that no essential details have been accidentally deleted or merged.
Additionally, remember that finished dimensions may vary slightly depending on your machine's calibration and the thickness of your material. A gap of even 1/16th of an inch can affect how tightly the box closes. If you notice consistent sizing issues, adjust your scale settings in your software by a fraction of a percent to compensate for material bulk. This level of attention to detail separates hobbyist results from professional-quality goods, especially if you are an entrepreneur selling these items at markets or online.
Elevating Your Final Presentation
The goal of using a Vintage Tea Cup SVG is to create a thoughtful handmade gift or a stunning decorative centerpiece. To achieve this, focus on the finishing touches. Fill the cup with treats, tea bags, or small gifts to surprise someone special, but ensure the contents do not exceed the weight limit of the paper structure. If the box is intended for heavy items, consider reinforcing the base with an extra layer of cardstock glued silently between the bottom panels.
When displaying your work as home décor, lighting and placement matter. The delicate design shines when paired with soft lighting that highlights the texture of the cardstock and the sheen of the ribbon. Avoid placing these paper creations in areas of high humidity or direct sunlight, which can cause the colors to fade or the paper to warp over time. By treating your creation with care, you extend its life as a cherished keepsake.
Ultimately, success with digital cutting files comes from balancing creativity with technical precision. By respecting the design constraints, adhering to the supply list, and utilizing the provided guides, you transform a simple digital file into a tangible object of beauty. Whether you are a beginner learning the ropes or a seasoned pro looking to streamline your workflow, taking the time to understand the nuances of the Vintage Tea Cup SVG ensures that every project you complete is one you can be proud to give or display.