Mastering Your Camping Lantern SVG Project: A Guide to Flawless Paper Craftsmanship
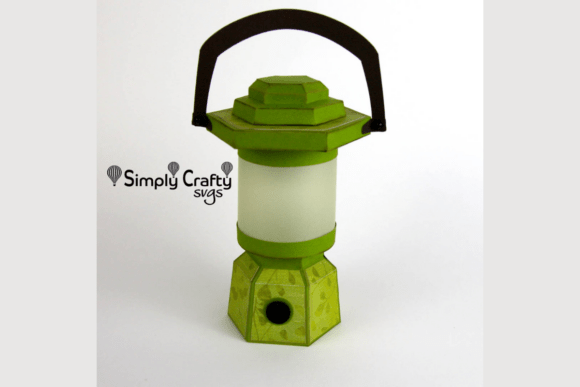
There is a distinct satisfaction in transforming flat sheets of cardstock into a glowing, three-dimensional object that evokes the warmth of an evening under the stars. The Camping Lantern SVG has become a favorite among crafters for this very reason. It offers a rustic charm that fits perfectly into home decor, party centerpieces, or thoughtful handmade gifts. However, while the final product—a detailed luminary with a lifting lid and space for a tealight—looks inviting, the path from digital file to finished craft is often littered with avoidable errors. Many enthusiasts rush into cutting and gluing without fully understanding the nuances of layered paper engineering, leading to frustration and wasted materials.
Understanding what makes this specific design work is the first step toward success. This isn't just a simple silhouette; it is a complex assembly of base panels, a handle, and a functional lid designed to house a light source. The finished dimensions of 5.6" x 4.2" x 7.3" require precision. When you approach a project like this, you are not merely cutting shapes; you are building a structure. Ignoring the structural integrity of your materials or misinterpreting the file layers can result in a lantern that collapses, looks uneven, or fails to let light shine through effectively.
The Trap of Ignoring Material Specifications
One of the most common misconceptions beginners face is assuming all cardstock is created equal. For a project requiring the sturdiness of a lantern, using standard printer paper or lightweight scrapbook paper is a recipe for disaster. The design relies on the rigidity of the material to hold its 3D shape without buckling under the weight of the handle or the pressure of assembly tabs. If you skip using high-quality, textured cardstock, such as the American Crafts AC Textured Cardstock often recommended for these builds, your lantern may look flimsy and unprofessional.
Furthermore, color selection plays a critical role in the final aesthetic. A frequent mistake is choosing colors that clash or fail to provide enough contrast between the structural elements and the decorative details. For instance, using a dark brown like "Coffee" for the handle against a leafy green body creates a natural, rustic look that mimics real outdoor gear. Conversely, mismatched tones can make the lantern appear disjointed. Always test your color combinations against the digital preview before committing your physical paper. Remember, the goal is to create a cohesive piece that feels intentional, not accidental.
Overlooking the Importance of Vellum and Light Diffusion
A camping lantern is defined by its glow, yet many crafters overlook the critical component responsible for this effect: the vellum. In this specific design, an 8.5" x 11" vellum sheet is intended for the light panel. A significant error occurs when users substitute this with clear acetate or even thin white paper. Clear plastic allows the harsh, direct beam of an LED tea light to shine through, revealing the bulb and wiring, which breaks the illusion of a warm fire. On the other hand, opaque paper blocks the light entirely, rendering the luminary function useless.
The correct approach is to use printed or frosted vellum, which acts as a diffuser. This material softens the light, creating that coveted ambient glow that makes paper lanterns so magical. If you find your light source is still too bright or visible, consider layering two sheets of vellum or lightly sanding the surface of a clear sheet to increase opacity. This small adjustment dramatically improves the quality of the finished product, turning a simple craft into a sophisticated decor item.
Missteps in File Preparation and Sizing
Before your cutting machine ever whirs to life, you must address the digital file itself. A prevalent issue arises when users fail to ungroup the Camping Lantern SVG elements properly. These files are often grouped for organization, but if you send them to the cutter while still grouped, the machine may cut around the entire perimeter rather than the individual intricate details. This leads to pieces that cannot be separated or assembled correctly.
Additionally, scaling is a delicate matter. While the design is compatible with letter-size paper, resizing the file without maintaining aspect ratios can distort the proportions of the lantern. If you stretch the image to fit a specific piece of leftover paper, the tabs may no longer align with their corresponding slots, making assembly impossible. Always check the dimensions in your design software against the recommended finished size of 5.6" x 4.2" x 7.3". If you need to adjust the size, do so proportionally and ensure your paper sheets (three 12" x 12" sheets for the base and lid, plus smaller sheets for panels) can accommodate the new measurements.
Assembly Errors That Compromise Stability
Even with perfect cuts, the assembly phase is where many projects falter. The temptation to use liquid glue generously is strong, but it is often the wrong choice for paper engineering. Liquid glue warps cardstock, causing wrinkles and weakening the structural bonds as the paper dries. Instead, rely on foam tape for dimension and strength, particularly where the base meets the panels. Foam tape not only provides a secure hold but also adds the necessary depth for the 3D effect.
Another oversight involves the functional aspects of the design, such as the lifting lid and the power button access. If you glue the lid down permanently or fail to leave adequate clearance for the switch of your battery-operated light, you defeat the purpose of the design. The top lid is engineered to lift easily for inserting lights or small gifts. Ensure your adhesive application respects these moving parts. Use enamel dots sparingly for decoration rather than structural bonding, and always dry-fit your pieces before applying any adhesive. This "measure twice, cut once" philosophy extends to "glue last," ensuring that every tab slides smoothly into place.
Making the Right Choices for a Professional Finish
To elevate your project from a hobbyist attempt to a professional-grade creation, pay attention to the finishing touches. The inclusion of a step-by-step video tutorial is a valuable resource that should not be ignored. Watching the assembly process helps clarify how the layers interact, something static images often fail to convey. Follow along with the tutorial to understand the sequence of operations, which is crucial for managing the multiple layers involved in this design.
When selecting your light source, opt for flickering LED tea lights rather than steady ones. The flicker mimics the movement of a real flame, enhancing the rustic atmosphere of the lantern. Also, consider the environment where the lantern will be displayed. If it is intended for outdoor use, ensure all adhesives are weather-resistant or keep the lantern in a sheltered area to prevent moisture damage to the cardstock.
Ultimately, the success of your Camping Lantern Luminary depends on patience and attention to detail. By choosing the right materials, respecting the digital file's integrity, and employing proper assembly techniques, you avoid the common pitfalls that lead to disappointment. Whether you are creating this for a personal collection, selling it at a craft fair, or gifting it to an outdoor enthusiast, taking the time to do it right ensures a result that shines brightly and stands the test of time. Embrace the process, learn from the nuances of paper crafting, and enjoy the warm glow of a job well done.