Chocolate Box 3: A Practical Guide to Precision Packaging for Ferrero and Beyond
Creating custom packaging is one of the most satisfying aspects of modern crafting, yet it is also where many creators stumble. The difference between a gift that looks professionally curated and one that appears hastily assembled often comes down to structural integrity and precise fit. This is where the Chocolate Box 3 enters the conversation. Designed specifically with dimensions that accommodate popular confections like Ferrero Rocher, this template offers a streamlined solution for those looking to elevate their gifting game. However, simply downloading a file is not enough. To truly leverage this tool, you must understand the nuances of material selection, machine compatibility, and assembly technique.
Understanding the Dimensions and Fit
The first thing any serious crafter should evaluate is the physical specification. The Chocolate Box 3 measures approximately 4″ x 1-3/8″ x 3-5/8″ (or 10cm x 9cm x 3.5cm). These are not arbitrary numbers; they are engineered to hold specific items securely without excessive movement. If you are planning to use this for Ferrero chocolates, the fit is nearly ideal. However, a common mistake beginners make is assuming that "close enough" is acceptable in packaging design.
If you attempt to force larger chocolates into this space, you risk distorting the box structure, causing the lid to pop off or the sides to bulge unnaturally. Conversely, using smaller items without internal filler can result in a rattling, unprofessional presentation. Before you commit to cutting an entire batch, always perform a physical mock-up using cardstock scraps. Verify that your specific chocolate brand or alternative treat fits snugly. This small step prevents the frustration of wasting premium paper on boxes that simply do not function as intended.
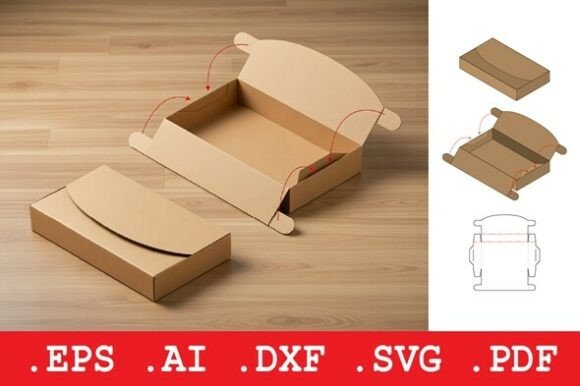
Navigating File Formats and Machine Compatibility
This cutting file is supplied as an instant digital download in a zip file, containing SVG, DXF, and PDF formats. While this versatility is a strength, it is also a source of confusion for many users. A frequent oversight is selecting the wrong file format for your specific cutting machine. For instance, if you are using a Cricut or Silhouette, the SVG format is generally preferred because it retains layer information and cut lines more accurately than other formats. Using a DXF file when an SVG is available can sometimes lead to disconnected paths or missing score lines, which complicates the assembly process.
Furthermore, the Chocolate Box 3 is compatible with both 8×12 and 12×12 cutting mats. This flexibility is excellent for users with smaller machines, but it requires careful attention to placement. One error that affects efficiency is failing to utilize the "mirror image" or "attach" functions correctly within your design software. If you do not attach the box components properly in the digital workspace, the machine may cut them in a scattered arrangement, wasting material and making weeding difficult. Always preview your mat layout to ensure the pieces are grouped logically. This approach saves time and reduces material waste, which is crucial for small business owners watching their overhead costs.
The Critical Role of Paper Weight and Texture
Perhaps the most significant factor in the final quality of your Chocolate Box 3 is the paper you choose. Because this is a blank cut file, the aesthetic responsibility lies entirely with you. Many hobbyists mistakenly believe that any decorative paper will suffice. In reality, the structural integrity of a box this size depends heavily on the weight of the material. Standard scrapbook paper (around 65-80 lb text weight) is often too flimsy to hold the shape of a 3D object without collapsing under the weight of the chocolates.
For best results, opt for cardstock that is at least 80 lb cover weight or higher. If you desire a textured or patterned look, consider adhering your decorative paper to a sturdier backing board. This technique, known as mounting, provides the visual appeal of intricate illustrations while maintaining the rigidity required for a professional finish. Additionally, be mindful of grain direction. Cutting against the grain can cause the box to warp or crack along the fold lines. Taking the time to align your cuts with the paper grain ensures crisp, clean edges and a box that opens and closes smoothly.
Avoiding Assembly Pitfalls
Even with perfect cuts and ideal materials, poor assembly can ruin the final product. A common misunderstanding is that glue type does not matter. Using wet glue on thin cardstock can cause warping and bubbling, while hot glue can add unnecessary bulk and create visible lumps. For the Chocolate Box 3, a precision liquid adhesive or double-sided tape is recommended. These options provide strong bonds without saturating the paper.
Another overlooked detail is the scoring process. If your machine allows for scoring, use it. If you are scoring by hand, ensure you use a bone folder to crease the lines sharply. Soft, rounded folds make the box look amateurish and can prevent the lid from sitting flush. Take your time during this stage. Rushing the folding process often leads to misaligned corners, which compromises the geometric symmetry of the box. Remember, the goal is to create a vessel that enhances the perceived value of the gift inside. A well-assembled box communicates care and attention to detail.
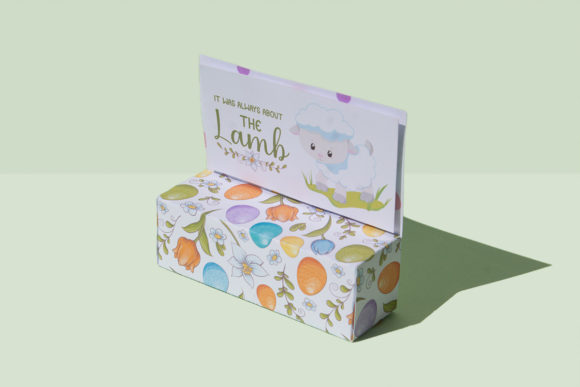
Customization for Different Occasions
One of the greatest advantages of the Chocolate Box 3 is its versatility. Because it is a blank template, it can be adapted for various occasions, from weddings to corporate events. However, some creators struggle with design cohesion. It is tempting to use overly busy patterns that distract from the simplicity of the box shape. A better approach is to let the quality of the paper speak for itself. Subtle textures, metallic accents, or minimalist typography often yield more elegant results than loud, chaotic prints.
Consider the recipient and the context. For a formal event, a solid color with a satin ribbon might be more appropriate than a playful illustration. For a birthday, brighter colors and personalized tags can add a festive touch. The key is to maintain balance. Ensure that any additional embellishments, such as stamps or die-cuts, do not interfere with the structural tabs of the box. Always test the assembly with your chosen decorations to confirm that they do not hinder the closing mechanism.
Final Checks Before Production
Before you proceed with a large production run, there are several checks you should perform. First, verify that your cutting blade is sharp. Dull blades can tear cardstock rather than cutting it cleanly, resulting in frayed edges that are difficult to assemble. Second, check your machine’s pressure settings. Too much pressure can cut through the backing mat or distort the paper, while too little may leave uncut sections that require manual trimming.
Finally, consider the user experience if you are selling these boxes. If you are providing them as part of a product line, ensure that they are easy for the end-user to assemble if shipped flat. Clear instructions and pre-scored lines can significantly enhance customer satisfaction. By paying attention to these details, you transform a simple digital file into a high-quality tangible product. The Chocolate Box 3 is a powerful tool, but its effectiveness depends entirely on the skill and care applied during its creation. With the right materials and techniques, you can create packaging that truly stands out.